Amazon Seller Account: How to Set It Up, Manage, Cancel and More
Selling on Amazon is one of the easiest ways to launch an online business. It all starts with creating your seller account, which becomes the hub for everything you do on the platform. That’s why new sellers often have many questions about how it works.
In this article, we answer the most common questions about Amazon seller accounts to help you get started with confidence.
What Is an Amazon Seller Account?
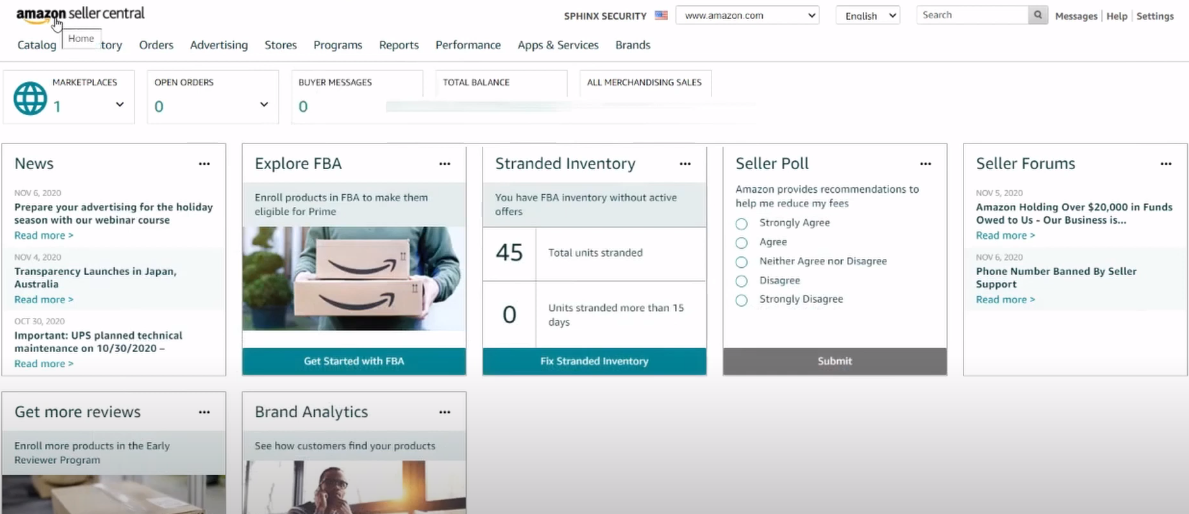
An Amazon seller account is the profile you create to sell products on Amazon’s marketplace. It gives you access to Seller Central, which is the platform where you can list products, track sales, manage inventory, communicate with customers, and access various selling tools. Your seller account serves as the central hub for operating and growing your Amazon business.
How to Create an Amazon Seller Account?
You can open an Amazon seller account by visiting Amazon’s website and signing up through Seller Central. You’ll need to enter your personal and business information and upload a few documents for verification.
Here’s how to get started:
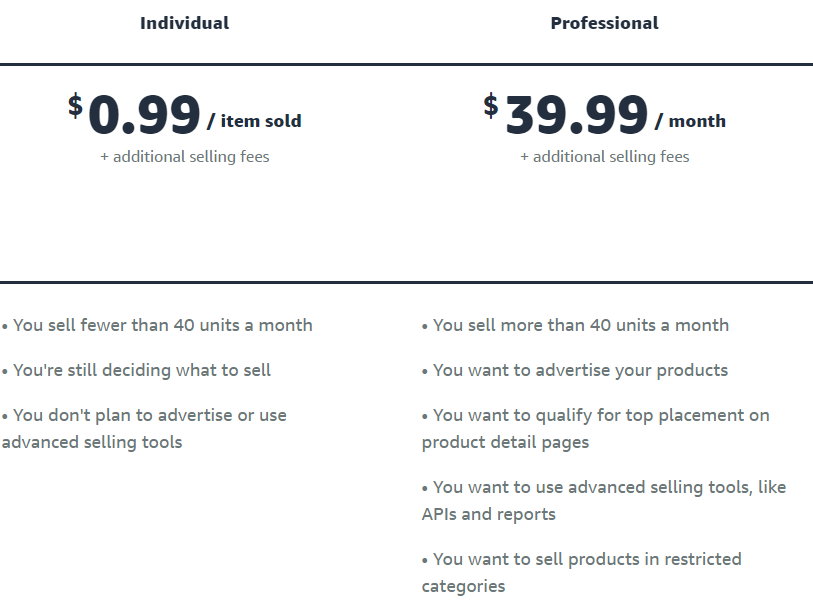
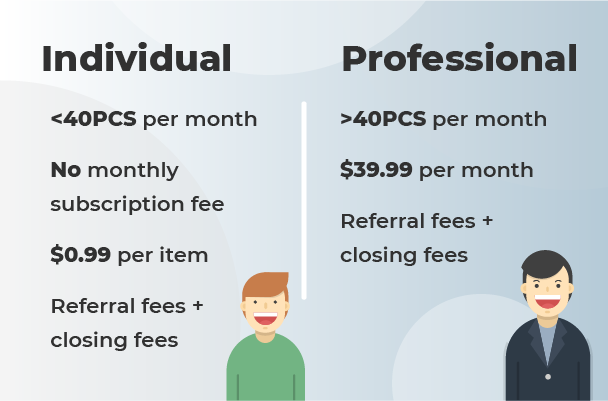
1. Go to the Amazon website and choose your selling plan. Under the Individual plan, each sale incurs a $0.99 fee, while the Professional plan has a monthly fee of $39.99. The main difference with the Professional plan is that it offers advanced features and is more cost-effective for sellers with high sales volumes.
2. Register your Seller Central account. Enter your email and create a password. Verify your email.
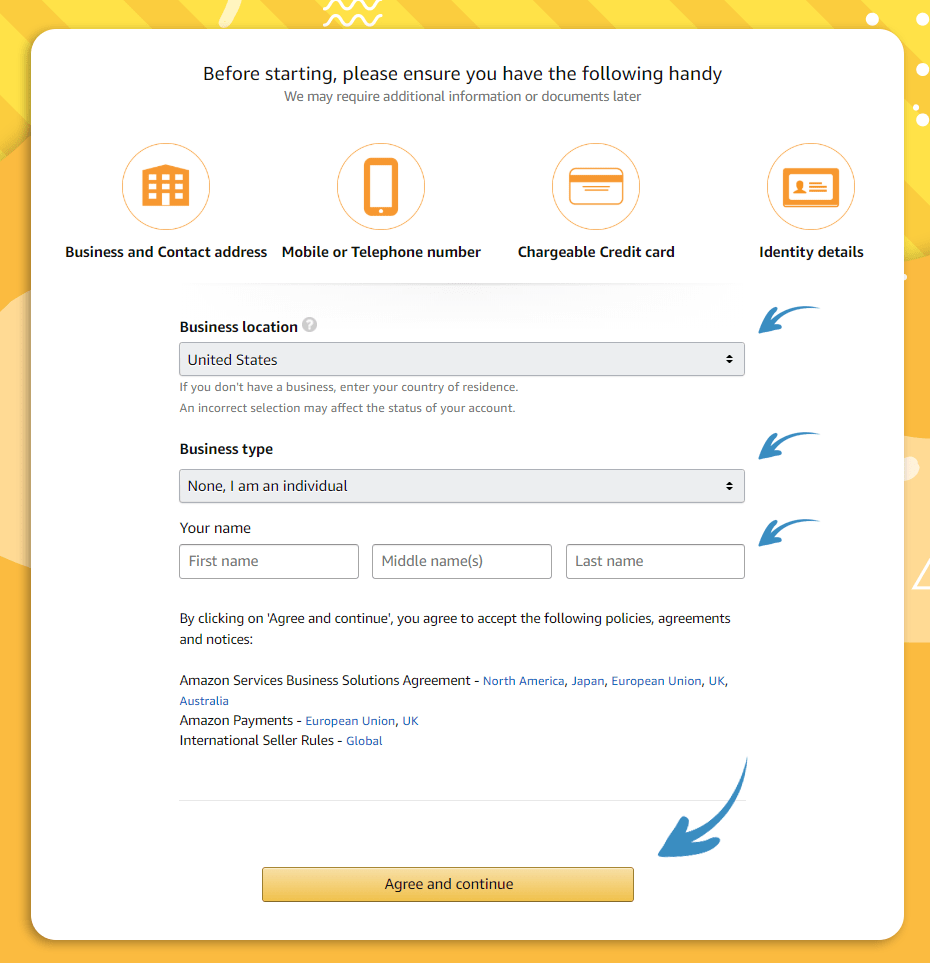
3. Fill in your business information. You will need to select the country in which your business is located, its type (if you do not have a company, select I am an individual).
4. Fill in your personal information. You must fill in:
Full Name
Citizenship
Address
Date of birth
Phone number (you will be asked to confirm it via SMS or phone call)
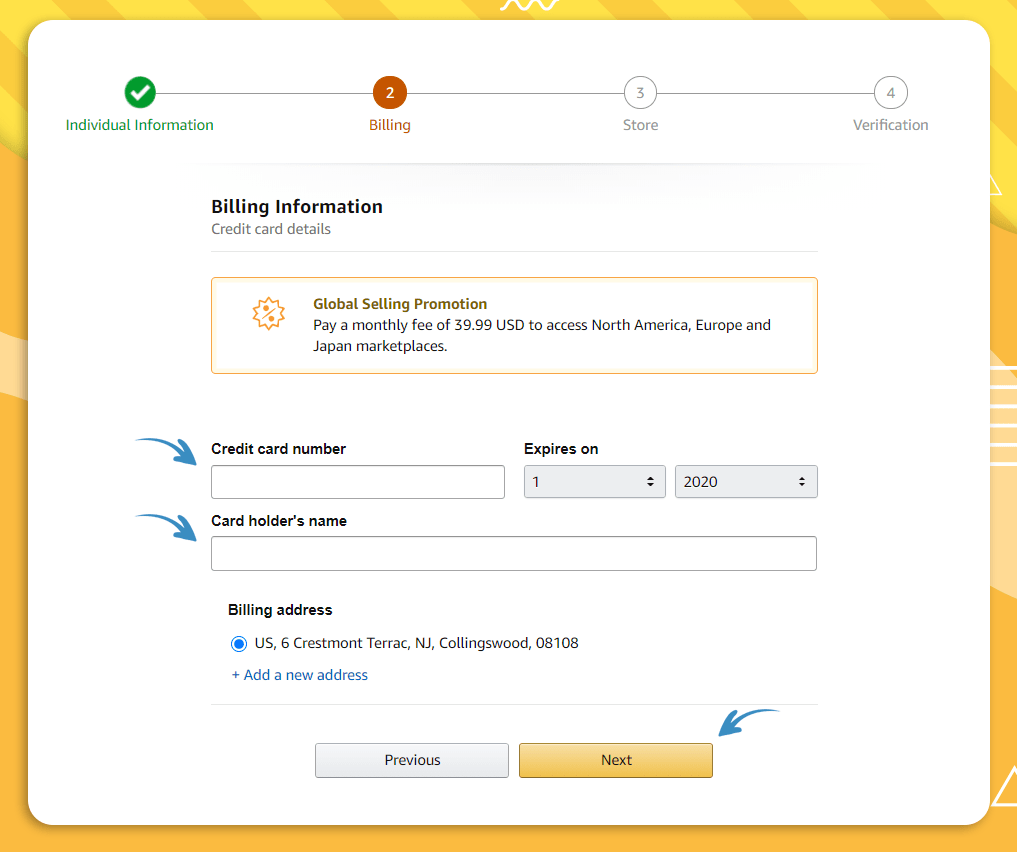
5. Complete your billing information. Enter your bank account and credit card details.
6. Complete the store information. Enter the store name and indicate whether you are a brand owner or a reseller of products.
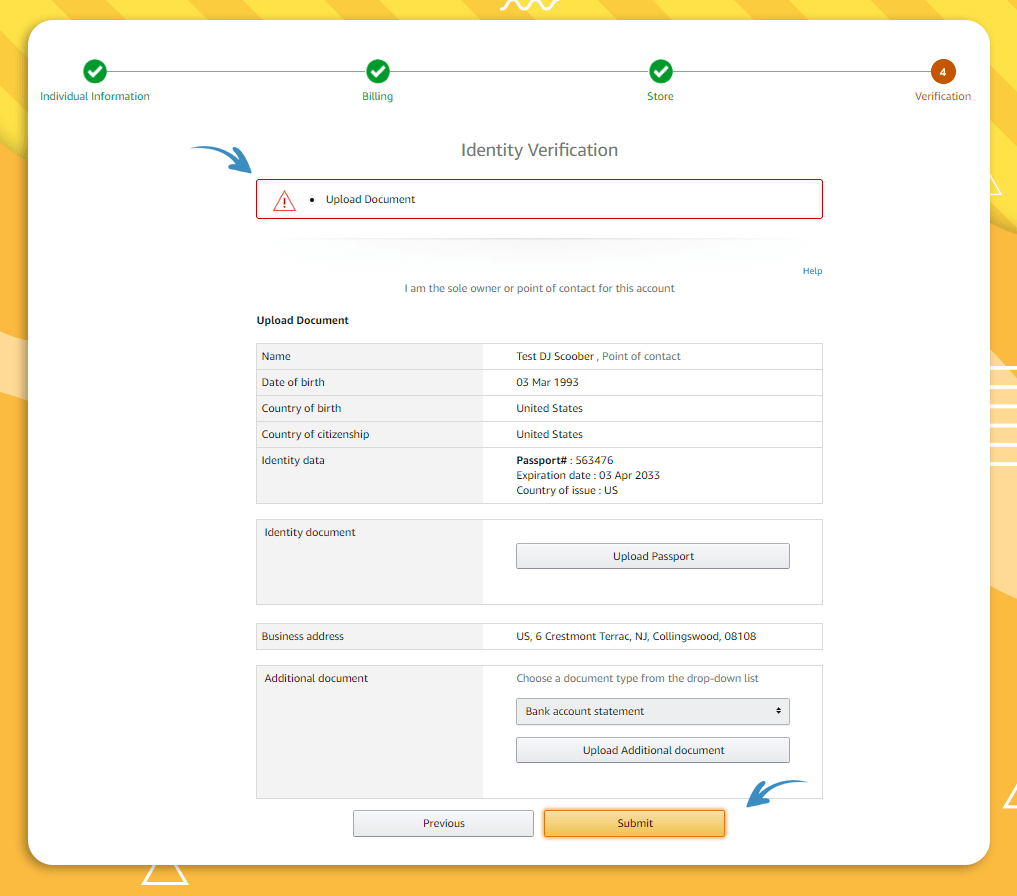
7. Submit your documentation. You will need to provide a bank statement and a photo of your ID. Once submitted, Amazon will schedule a verification video call. Make sure you have your ID and a valid credit card with you.
Once your account is approved, you’ll be able to log in and start setting up your store.
What Documents Do I Need to Open an Amazon Seller Account?
To register a seller account on Amazon, you’ll need several official documents for identity and business verification (e.g., driver’s license or state ID, phone bill, etc.). Requirements may vary slightly by country, but here’s what’s typically needed in the U.S.:
Government-issued photo ID (e.g., U.S. passport, driver’s license, or state ID)
Proof of address (e.g., recent utility bill, phone bill, or bank statement dated within 60–180 days)
Bank account statement with your name and account number
Chargeable credit card for billing and fees
Tax information: Social Security Number (SSN) for individuals or Employer Identification Number (EIN) for businesses
Business registration documents (if registering as a business): Articles of incorporation, business license, EIN confirmation, etc.
Make sure all documents are clear, up to date, and match the information you provide during registration. For marketplace-specific requirements, always check the official Amazon Seller Central website for your country.
How to Set Up an Amazon Seller Account
To set up your Amazon seller account, go to your Seller Central dashboard after completing registration. This is where you'll configure your account settings, add products, choose a fulfillment method, and prepare your business to start selling successfully.
Here's a step-by-step guide:
1. Set up shipping and fulfillment preferences. Log in to Amazon Seller Central and decide whether you'll ship products yourself (FBM) or use Amazon FBA. Configure shipping rates, return policies, and warehouse prep if using FBA.
2. Add your product listings. If you're selling an existing product already on Amazon, join the existing listing by matching the ASIN. If you're launching a new product, create your own listing with optimized titles, bullet points, descriptions, images, and backend keywords.
Note: For faster results, consider using the AMZScout AI Listing Builder — it creates SEO-optimized, customer-friendly listings in seconds.
3. Link a valid bank account and chargeable credit card. Add your payment method to receive sales payouts and cover Amazon fees.
4. Turn on two-step verification. Enable two-factor authentication to secure your account from unauthorized access.
6. Customize your seller profile. Add your business logo, description, and support contact.
A complete setup ensures smooth selling, avoids account issues, and helps you grow your Amazon business from day one.
Can I Use My Personal Bank Account for an Amazon Seller Account?
Yes, you can use a personal bank account to set up your Amazon seller account, as long as it’s in your name. This is perfectly fine if you’re just starting out. However, if you plan to grow your business, using a separate business bank account can make it easier to manage payments, bookkeeping, and taxes.
Is an Amazon Seller Account Free?
Yes, creating an Amazon seller account is free, but there are costs once you start selling. Here’s what to expect:
Selling plan fee: Individual plan – $0.99 per sale or Professional plan – $39.99/month (no per-item fee)
Referral fees: Amazon takes a percentage of each sale, typically around 15%.
FBA fees (if using Fulfillment by Amazon): Cover storage, packing, and shipping.
Advertising costs (optional): You can promote products using Amazon Ads for more visibility.
Tip: Choose your selling plan based on your expected volume. If you plan to sell more than 40 items/month, the Professional plan is usually more cost-effective.
How Much Does an Amazon Seller Account Cost?
Creating an Amazon seller account is free, but actual costs depend on your selling plan and services used. Here's a breakdown:
Selling Plan Fees: You can select between an Individual plan at $0.99 per item sold (no monthly fee) or a Professional one at $39.99 per month (no per-item fee).
Referral Fees: A percentage of each sale - typically around 15%, varying by product category.
Fulfillment Fees (FBA): If you use Fulfillment by Amazon, you’ll pay for storage, packing, and shipping based on size and weight.
Optional Advertising Costs: Promote your listings using Amazon Ads. Costs vary depending on budget and campaign settings.
Other Potential Fees: High-volume or long-term storage (if using FBA), returns processing for customer returns.
What Is the Difference between an Individual and a Professional Seller Account?
The key difference between Amazon’s seller plans is pricing and available features. The Individual plan has no monthly fee but charges a $0.99 fee for every item sold. The Professional plan costs $39.99/month with no per-item fees, making it more cost-effective if you sell over 40 items a month.
It also unlocks bulk uploads, access to promotions (like deals and coupons), and advanced reports. You can change plans anytime in Seller Central.
How Long Does It Take for Amazon to Approve a Seller Account?
Most Amazon seller accounts are approved within a few hours to 3 business days. However, it can take longer (sometimes up to a few weeks) if Amazon needs to verify business details or request additional documentation. If your approval is delayed, you can escalate the issue by contacting Amazon Seller Support.
Can I Change My Amazon Seller Account from Individual to Business?
Yes, you can easily switch from an Individual to a Professional seller account at any time through Seller Central. Here’s how to do it:
Log in to your Amazon Seller Central account and click the gear icon in the top-right corner of the dashboard.
Choose Account Info from the dropdown menu.
Under the Manage Your Services section, select Selling on Amazon.
Select your plan and click Apply Changes.
Your plan type will be updated immediately.
What Is Amazon Seller Central?
Amazon Seller Central is the main dashboard you use to manage your Amazon business. After setting up your seller account, this is where you list products, manage inventory, respond to customers, and monitor your performance. It’s the central hub for running and growing your business on the platform.
How to Manage an Amazon Seller Account?
To manage your Amazon seller account effectively, regularly check your Seller Central dashboard. There, you can monitor performance metrics such as order volume, sales trends, and overall account health. Based on this data, you can adjust your strategy - for example, by switching fulfillment methods if you're experiencing frequent delays.
How to Add a User to My Amazon Seller Account?
To add a user to your Amazon seller account, log in to Seller Central and navigate to Settings > User Permissions. Enter the email address of the person you want to invite and click Send Invitation. After they accept, you can assign specific permissions, such as managing inventory, handling orders, or viewing reports. Note that this feature is only available to Professional seller accounts.
How to Set Up Amazon FBA (Fulfilled by Amazon) for My Seller Account?
To set up Fulfilled by Amazon (FBA), log in to Seller Central and enable FBA under Settings > Fulfillment by Amazon. When listing a product, “Fulfilled by Amazon” will automatically appear as the shipping method. Then, prepare and ship your inventory to Amazon’s FBA centers, following their packaging guidelines. Amazon will take care of storage, shipping, customer service, and returns.
How to Remove Countries from an Amazon Seller Account?
To remove a country from your Amazon seller account, go to Seller Central > Settings > Account Info > Marketplace Settings and deactivate the marketplace. You must also hard delete all SKUs listed for that country as simply closing listings or setting inventory to zero isn’t enough. For a full cleanup or if you're consolidating multiple accounts, check Amazon’s guide on merging accounts.
What Are Amazon Seller Fees and How Are They Calculated?
Amazon seller fees refer to the money you pay to use Amazon’s platform, tools, and services. Here are the most common types:
Referral fees: A percentage of each sale (typically around 15%) based on product category.
Subscription fee: $39.99/month for Professional sellers, or $0.99 per item sold for Individual sellers.
FBA fees: If you use Fulfillment by Amazon, you'll pay for storage and shipping based on your product’s size and weight.
Optional fees: These may include advertising, returns processing, or refund administration.
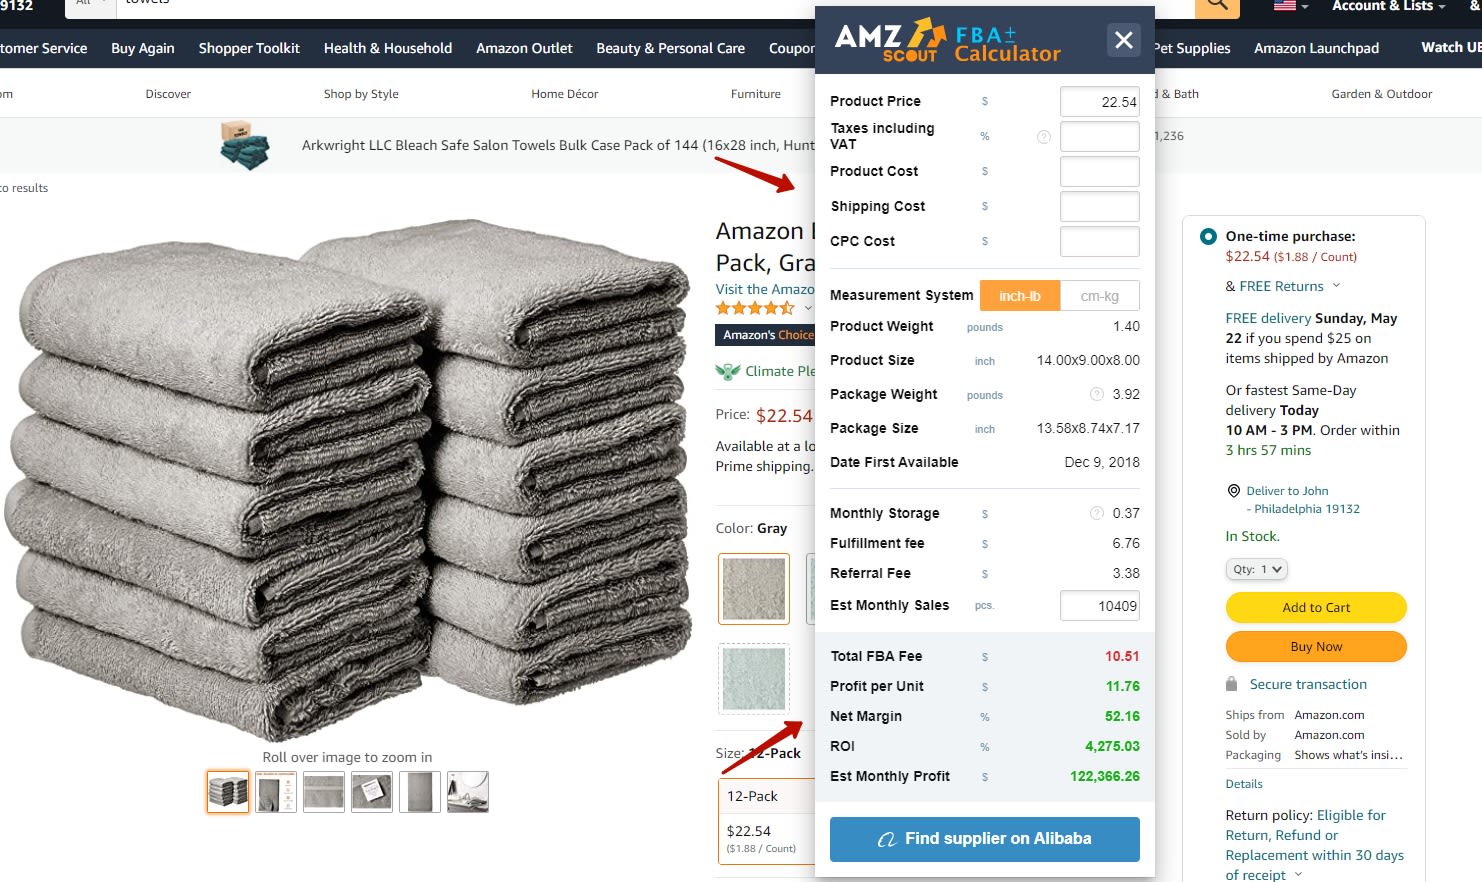
You can estimate FBA-related costs using AMZScout’s free FBA Calculator.
How to Add Products to My Amazon Seller Account?
To add products to your Amazon seller account, log in to Seller Central and go to Inventory > Add a Product. If you're selling an existing product, search for it by name or ASIN and join the listing. If you're selling a new product, click “I’m adding a product not sold on Amazon” and create a new listing. Check out this guide on generating SEO-friendly listings that appeal to customers.
How to Track Amazon Seller Account Performance?
To track your Amazon seller account performance, go to Seller Central → Performance → Account Health. There you’ll see key metrics like order defect rate and late shipment rate. For deeper insights, check Business Reports under the Reports tab. Learn more about which metrics matter in this guide.
Why is My Amazon Seller Account Deactivated?
To find out why your Amazon seller account was deactivated, check the email notification from Amazon or your Account Health dashboard in Seller Central. Common reasons include policy violations (e.g., restricted items, fake reviews) and poor performance metrics (e.g., high order defect or late shipment rates). For more details and how to fix the issue, read this guide.
How to Reactivate a Suspended Amazon Seller Account?
To reactivate a suspended Amazon seller account, first identify the reason for the suspension. Amazon usually explains this in an email. Then, address the issue and write a Plan of Action (POA) outlining what went wrong, how you fixed it, and how you’ll prevent it from happening again. Submit your appeal through Seller Central. For more info, check out this guide.
How to Pause an Amazon Seller Account?
You can pause your Amazon selling activity by downgrading to the Individual plan. This way, you won’t pay any fees if you don’t make sales. Here’s how:
Go to Seller Central → Settings → Account Info.
Under Your Services, cancel your Professional subscription.
Your account automatically switches to the Individual plan, which has no monthly fee.
Your account will automatically switch to the Individual plan, allowing you to keep your account, listings, and history. You can upgrade back to the Professional plan anytime when you’re ready to sell again.
If I Close My Amazon Seller Account, Can I Reopen It?
Once you permanently close your Amazon seller account, you cannot reopen it. If you just need a break, it’s better to cancel your Professional plan. With an Individual plan, you won’t be charged if you make no sales. If you do close your account and want to sell again later, you’ll need Amazon’s approval to open a new one.
How to Close an Amazon Seller Account?
To close your Amazon seller account, go to Seller Central > Settings > Account Info, then scroll down and select Close Account. Before doing so, make sure your balance is zero and there are no open orders or unresolved issues. Once the account is closed, it can’t be reopened, so if you’re planning to take a break, consider downgrading to an Individual plan instead.
Can I Close My Amazon Seller Account and Open a New One?
Amazon usually allows only one seller account per person or business. Closing your current account and opening a new one without a valid reason may lead to suspension. If you have a legitimate business need (like running separate brands), you must request Amazon’s approval and meet its requirements.
How to Sell an Amazon Seller Account?
You can’t sell an Amazon seller account directly, as it violates Amazon’s policies. However, you can sell the business entity (such as an LLC or corporation) that owns the account. This approach allows you to legally transfer the account, along with its brand and inventory.
To do this:
Transfer ownership of the legal business, not just the login credentials
Update the bank account, tax information, and contact details in Seller Central.
Notify Amazon about the change in business structure.
Consider consulting a lawyer to ensure everything is handled properly and remains compliant with Amazon’s terms.
Conclusion
An Amazon seller account is the foundation of your business on the marketplace. Whether you're just getting started or looking to improve your setup, understanding how your account works is key to long-term success. Properly managing it helps you avoid common pitfalls and keeps your business running smoothly.

