What is Amazon FBA (Fulfillment by Amazon): Guide 2025
Amazon FBA is the most popular method of selling on Amazon. Over 90% of third-party sellers use FBA, a healthy portion of them making over $5 thousand per month in sales.
But if you want to make some real money, you need to know where to start. To find out how to effectively use Amazon FBA, check out our guide below.
Table of contents
What is Amazon FBA?
What does Amazon FBA stand for? FBA stands for Fulfillment By Amazon. It allows sellers to outsource product fulfillment to Amazon, meaning they handle the shipment and storage of your products.
FBA sellers will always have the Amazon Prime label you see on the website, which can help boost sales. Both small and large sellers can take advantage of FBA. In fact, as of 2025, about 82% of active Amazon marketplace sellers use FBA, showing how popular and effective it has become for streamlining operations.
How Does Amazon FBA Work?
Amazon FBA starts by having your products sent to fulfillment centers. From there, Amazon employees take your products, store them in their facilities, and ship them on your behalf anytime someone clicks the “Buy Now” or “Add To Cart” button. Amazon also handles customer service, returns, and storage, making it ideal for sellers without a warehouse.
The platform’s popularity continues to grow: over 1.1 million new sellers joined Amazon last year, and around 64% of sellers reported becoming profitable within their first year. This demonstrates that, with the right strategies, FBA can be a highly effective way for ambitious sellers to scale their business and compete alongside veteran sellers.
What Are the Pros and Cons of Amazon FBA?
To understand the pros and cons of using FBA, you need to know the alternatives. There are two: FBM (Fulfillment By Merchant) and using a third-party fulfillment company.
First, let’s take a look at the reasons you should or should not pursue FBA.
Pros:
FBA allows you to outsource shipping, customer service, and storage.
You can earn sales faster because FBA lets you reach a wide audience.
FBA can cost you less than using other shipping methods (third-party suppliers, DHL, UPS, and FedEx)
Most of your inventory management is automated, as Amazon sends you updates when you make a sale or lose inventory.
Cons:
You can have stranded inventory stuck in an Amazon warehouse if Amazon is your only sales channel.
You can’t control the quality of shipping, which might be an issue if you send fragile items.
The service costs less than some third-party suppliers, but still quite a lot.
To see how FBA compares to alternative options, check out these comparisons:
Amazon FBM vs FBA
FBM is when the seller (or merchant) handles shipment and storage themselves. Here are the pros and cons of FBM:
Pro:FBM is ideal if you have an existing logistical network. This is good if you want to avoid paying Amazon’s FBA fees, which can average around 15% of the product price plus storage costs.
Pro: Through FBM, you won’t need a minimum order that comes with outsourcing to third-party companies.
Con: FBM sellers often don’t rank as well as FBA sellers. Amazon prefers it when you use internal services, and data shows FBA listings are nearly 20% more likely to appear in the Buy Box.
Con: You have to handle customer service, returns, and fulfillment yourself, creating more hassle. Surveys indicate that sellers using FBM spend on average 2–3 hours per day on these tasks compared to FBA sellers.
Amazon FBA vs using third-party fulfillment services
Alternatively, you can choose to use a third-party fulfillment service. Here is how external fulfillment services might compare to FBA:
Pro: Using outside fulfillment options might give you better distribution channels outside of Amazon.
Pro: Smaller, third-party fulfillment companies offer services Amazon might not provide.
Con: FBA still generally ranks higher than third-party services.
Con: The service quality might be dodgy with these smaller companies. You might also have to make minimum monthly orders.
Ultimately, it's hard to compete with Amazon FBA. Despite needing to pay fees, FBA sellers reach more locations and provide consistent services.
How Can I Start Amazon FBA and Succeed as a Seller?
Now that you know a bit more about FBA and how it compares to other options. Now, you need to understand how to use it. Below, you’ll find our proven five-step process for Amazon FBA.
1. Sign Up to Become a Seller
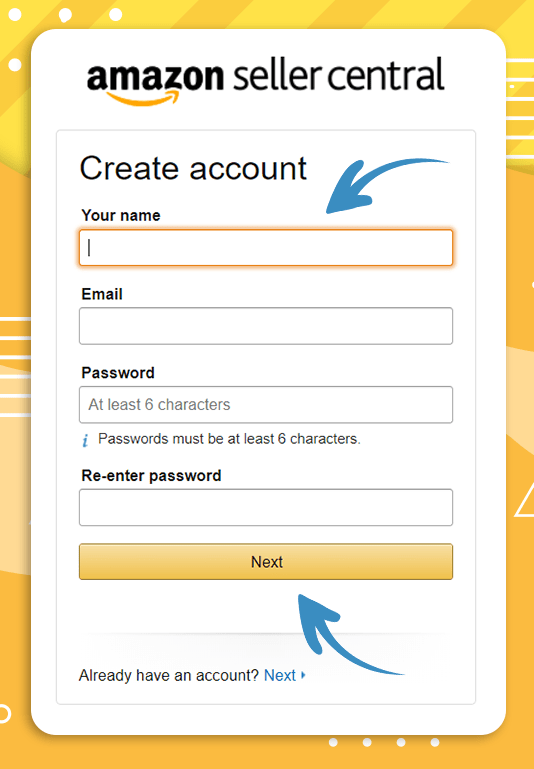
Before you can sell on Amazon, you need a seller account. This account gives you access to Amazon Seller Central, which is where you’ll be managing your seller account.
To start, go to Amazon’s sign-up page. You can use your normal Amazon account to save you time. Regardless, be sure it has accurate information, as you’ll need to confirm it later.
You’ll need to provide information like your name, your address, and your contact information. Once you get through that, you’ll need to take four additional steps to verify yourself.
These steps include verifying your bank account, sending front and back photos of your ID, and receiving a postcard with a code to verify your physical address. You will also need to take a video interview with Amazon, bringing your bank statements and IDs to prove your identity.
You’ll also need to provide a regular payment card to sign up for an Amazon Individual or Professional Account. An individual account costs $0.99 per listing while a Professional Account costs $39.99 per month and charges $0 per listing. Professional accounts also get more advertising features, which is ideal if you plan on selling more than 40 items.
2. Find a Product to Sell
The most important part of starting your Amazon business is picking effective products. Choosing the right products can help you earn greater profits, feeding into the eCommerce business you want to be successful.
To start, you need to know what to look for to make your product search easier. Below are some general suggestions you can use to find the best products:
Choose products that cost between $15 to $50. These will move relatively fast while ensuring you avoid cheap items that don’t make a profit.
Stick with small and light products. Small and light products require less cost to ship because of their weight and the number of boxes you can fit in a storage area. As a result, you save money on all fronts.
Focus on low-competition, high-demand products. To start, you generally want to avoid products that have too much competition, but still have high demand. Try and combine areas that have more than ten thousand sales, but not more than 100 reviews (or something nearby).
Be wary of seasonal products. Seasonal products, like snow boots, are generally only popular during a short period in the year. When selling them, be sure to plan for when those sales fall off.
Keep an eye out for gated products. These products require additional certifications or licenses. In some cases, they might also be trademarked by other groups. Account for the extra effort necessary to sell these products.
Identifying all of these in your products will help you sell more effectively. But if you want to save time and research all factors at once, you’ll need to use two tools.
Using the AMZScout Product Database to find products
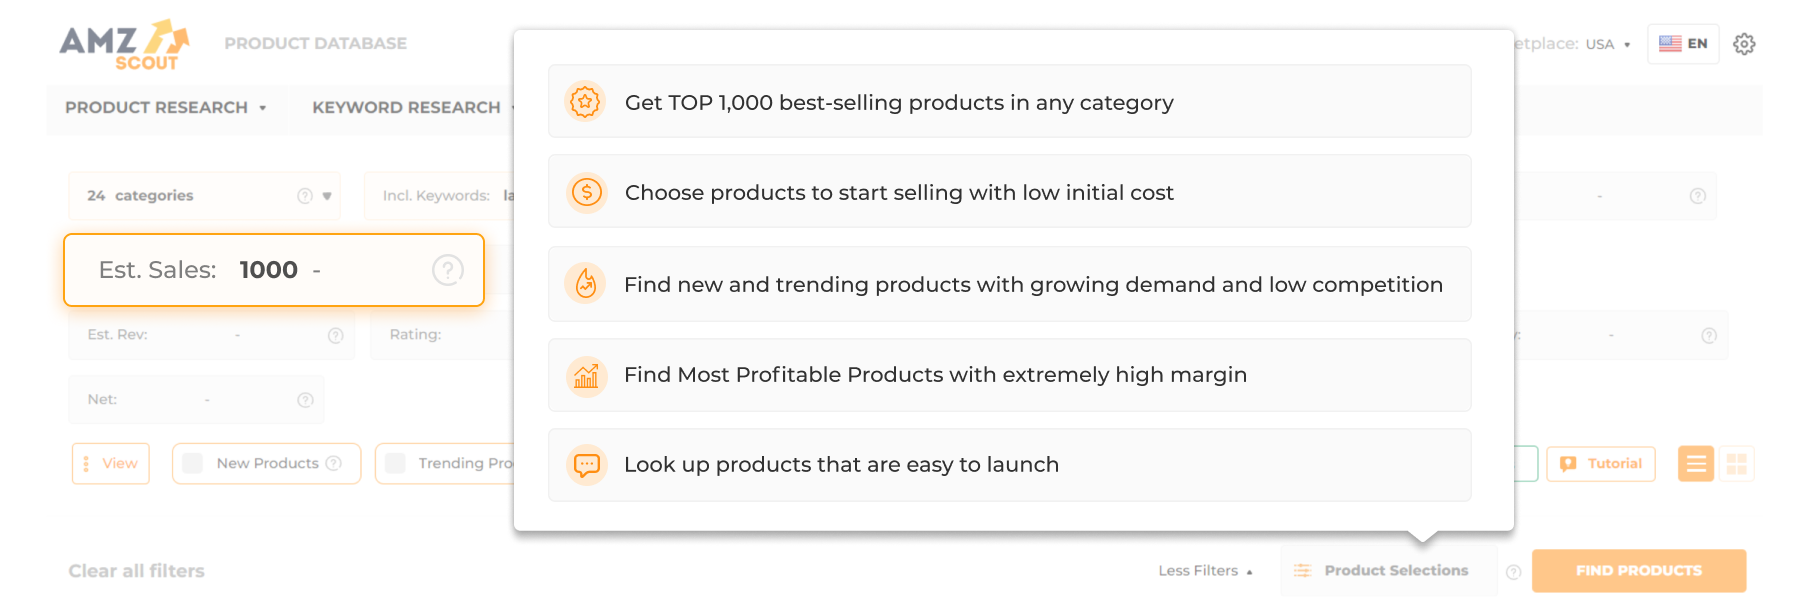
The AMZScout Product Database is a great starting point if you want to find a list of potential products. Below are the steps you can follow to get started:
Open the AMZScout Product Database. You can log in to your account by taking advantage of the AMZScout Seller's Bundle. No payment card is necessary to start.
Set product criteria. You can set these using the search filters. For example, you might use our suggestion above to filter by number of sales. If you don’t know where to start, use our ready-made Product Selections.
Get your results. Click the “Find Products” button to populate results.
Choose your favorite products. Create a list of products that you find the most interesting.
Once you’ve got a starting list of products, you can move on to the next step: analyzing the sales potential.
Using the AMZScout PRO AI Extension to look at profitability
The AMZScout PRO AI Extension provides you with extra details you can use to determine whether a product is worth selling. To get started with this tool, follow these steps:
Install the AMZScout PRO AI Extension for Chrome. Enter some basic information to get started. You don’t need a payment card to start your free trial.
Search on Amazon using the regular search bar or the Product Database. Once the results load, click the AMZScout icon to open the extension.
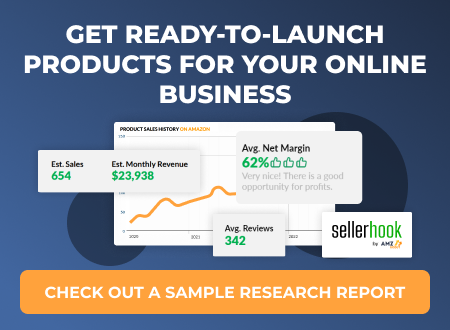
Analyze profitability by checking sales, revenue, and net margins displayed at the top of the product table.
Evaluate product potential using the Product Score, which estimates sales based on current market conditions.
Review AI insights:
AI Niche Analysis evaluates profit potential, demand, and competition, giving an overall success score.
AI Product Insights offers a SWOT analysis of top-performing products.
AI Product Improvement suggests enhancements like design, features, or packaging to stand out.
AI Listings Keyword Density identifies top keywords to optimize titles, descriptions, and PPC campaigns.
3. Enroll in the FBA Program
Literally, all sellers can enroll in FBA. To start, you just need to add FBA to your account. You can use the link which guides you to the proper account settings.
After your account is established for FBA, you’ll need to be sure your product listings are ready for FBA.
4. Create a Product Listing
When setting up your inventory for FBA, you have one of two options: create a new listing or change existing listings.
If you want to sell your own brand new product, you’ll need to create your product listings. To do this, follow these steps:
Click Add a product from the inventory menu on your Seller Central account.
If selling an existing product, search for the product using the product code (UPC, EAN, ISBN).
If selling a new product, insert your unique product code.
Select variations (if appropriate), the condition, and click Sell this product.
Enter details through the product listing.
If listing multiple products, you can also choose to add products in bulk.
When changing your existing inventory and product listings for FBA, you just need to follow these steps:
Visit the Manage Inventory page.
Select Change to fulfilled by Amazon from the actions menu.
Click Convert & send inventory.
Regardless of what steps you take, your next step is to send your newly listed products to Amazon.

5. Send Inventory to Amazon
To send inventory to Amazon, you’ll need to get an Amazon packing slip. Thankfully, Amazon provides this for you by going through these steps:
Go to your Manage Inventory page.
Select Send/replenish inventory from your action menu.
Select Create a new shipping plan.
Confirm your ship-from address (where the shipment will be picked up). If you work with other suppliers, this can be from their warehouse. Otherwise, you can choose your home address.
Confirm your product’s packing type. Individual products include multiple products and types sent in a single shipment. Case-packed products are multiples of the same products sent from a manufacturer.
Click Continue to shipping plan.
Select the quantity of products (gathered from your current product listings) that you will be sending.
After going through this process, you’ll either want to hand it to your warehouse or go to a shipping company. Amazon typically provides you with a packing slip that works for companies like FedEx or UPS. If doing this yourself, familiarize yourself with Amazon’s packing and prep requirements.
Once your inventory arrives, you can activate your listing and make your first sale. At this point, Amazon will fulfill an order on your behalf whenever someone buys from you.
Amazon will also provide you with the option to receive inventory notifications. While FBA does handle the shipping, returns, and customer service, you still need to manage your stock and send more before you run out to keep making money.

What Are the Tips for Succeeding as an FBA Seller?
Now that you have a better idea of how FBA works, here are some tips you can take with you to improve your odds:
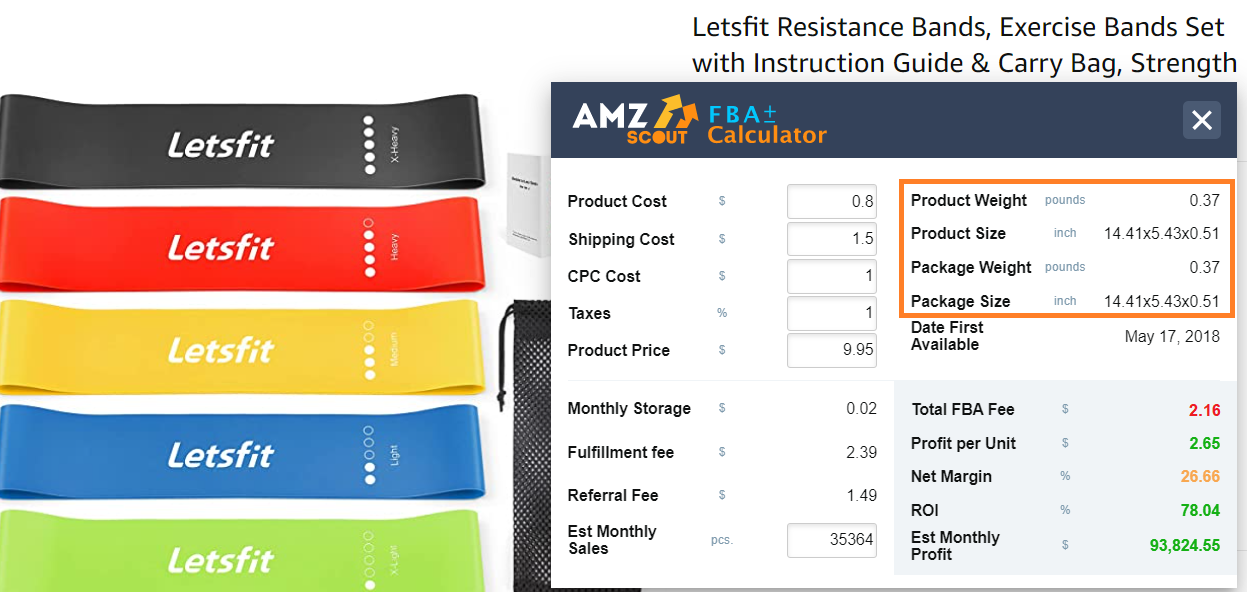
Do your math in advance. The fees, profits, and margins all need to be calculated in advance to be sure you have a good product. You’ll want to know what your earnings could be if you need to adjust your price. To find this out easily, use the AMZScout FBA Calculator.
Use FBA Small and Light for lower fees. Paying less for FBA services is ideal, this is why you should consider the FBA Small and Light program. The Small and Light program requires you to follow specific steps and download an enrollment template. However, the extra steps can save you a lot of money.
Explore FBA courses. There is a wealth of information from those who make that elusive $ 5 thousand (or more) a month. Knowledge can help you be more effective in anything. Check out this free FBA Masterclass to get started with an effective coach.
These are only three tips, but it's best to keep things simple when starting. Start small and grow once you get comfortable with how FBA works.
Conclusion
Amazon owns 50% of the world’s eCommerce market. Because of this, FBA is an excellent business model for sellers at any level to make a living. This works for private label sellers, wholesale sellers, and online arbitrage sellers.
If you want to start as an FBA seller, the explained five-step process above is to get a head start. We won’t say it will be effortless, but it will help you get a head start against the competition.
FAQs
How does Amazon FBA work?
Amazon FBA (Fulfillment by Amazon) lets sellers store their products in Amazon’s warehouses. When a customer buys, Amazon handles packing, shipping, and customer service. Sellers benefit from faster delivery, Prime eligibility, and reduced logistics work, allowing them to focus on sourcing and marketing products rather than managing fulfillment themselves.
Does FBA cost money?
Yes, FBA has fees. Sellers pay for storage and fulfillment, which covers picking, packing, shipping, and customer service. Fees vary by product size, weight, and storage duration. While it adds costs, many sellers find it worth paying for faster delivery, Prime eligibility, and less operational hassle.
How much do FBA Amazon sellers make?
Earnings vary widely. Some sellers earn a few hundred dollars monthly, while successful ones can make thousands or more. Profit depends on product choice, pricing, sales volume, and fees. On average, 64% of new Amazon sellers report becoming profitable within the first year using FBA.
What are the disadvantages of Amazon FBA?
FBA comes with fees, including storage and fulfillment costs, which can cut profits. Sellers also lose some control over packaging and shipping speed. Long-term storage fees can add up, and handling inventory mistakes or returns can be costly. Finally, competition is high, so success requires smart product selection and marketing strategies.


